原创
RabbitMQ交换器
温馨提示:
本文最后更新于 2019年03月21日,已超过 2,482 天没有更新。若文章内的图片失效(无法正常加载),请留言反馈或直接联系我。
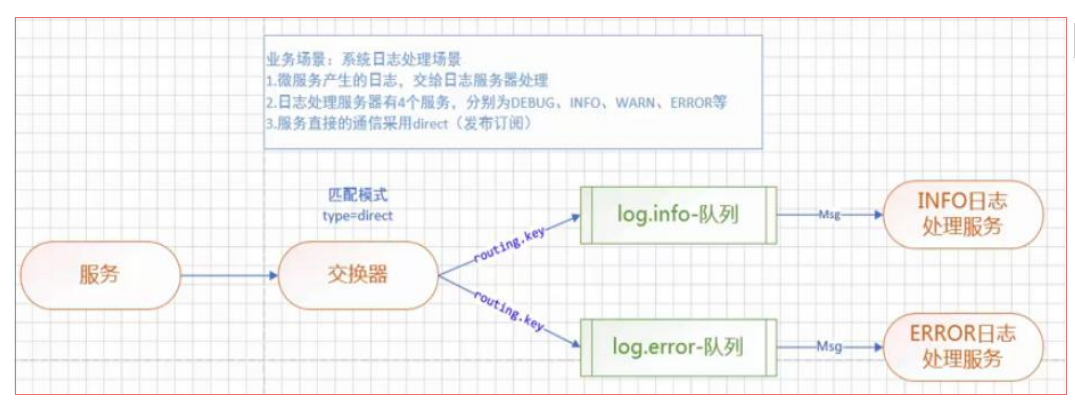
Direct交换器
发布与订阅,完全匹配。

生产者
pom.xml
<?xml version="1.0" encoding="UTF-8"?>
<project xmlns="http://maven.apache.org/POM/4.0.0" xmlns:xsi="http://www.w3.org/2001/XMLSchema-instance"
         xsi:schemaLocation="http://maven.apache.org/POM/4.0.0 http://maven.apache.org/xsd/maven-4.0.0.xsd">
    <modelVersion>4.0.0</modelVersion>
    <parent>
        <groupId>org.springframework.boot</groupId>
        <artifactId>spring-boot-starter-parent</artifactId>
        <version>2.1.4.RELEASE</version>
        <relativePath/> <!-- lookup parent from repository -->
    </parent>
    <groupId>com.lzhpo.rabbitmq</groupId>
    <artifactId>rabbitmq-direct-provider</artifactId>
    <version>0.0.1-SNAPSHOT</version>
    <name>rabbitmq-direct-provider</name>
    <description>Demo project for Spring Boot</description>

    <properties>
        <java.version>1.8</java.version>
    </properties>

    <dependencies>
        <dependency>
            <groupId>org.springframework.boot</groupId>
            <artifactId>spring-boot-starter-amqp</artifactId>
        </dependency>
        <dependency>
            <groupId>org.springframework.boot</groupId>
            <artifactId>spring-boot-starter-web</artifactId>
        </dependency>

        <dependency>
            <groupId>org.springframework.boot</groupId>
            <artifactId>spring-boot-starter-test</artifactId>
            <scope>test</scope>
        </dependency>
    </dependencies>

    <build>
        <plugins>
            <plugin>
                <groupId>org.springframework.boot</groupId>
                <artifactId>spring-boot-maven-plugin</artifactId>
            </plugin>
        </plugins>
    </build>

</project>
application.properties
spring.rabbitmq.host=localhost
spring.rabbitmq.port=5672
spring.rabbitmq.username=guest
spring.rabbitmq.password=guest

#设置交换器的名称
mq.config.exchange=log.direct
#info 路由键
mq.config.queue.info.routing.key=log.info.routing.key
#error 路由键
mq.config.queue.error.routing.key=log.error.routing.key
#error 队列名称
mq.config.queue.error=log.error
Sender
package com.lzhpo.rabbitmq.rabbitmqdirectprovider;

import org.springframework.amqp.core.AmqpTemplate;
import org.springframework.beans.factory.annotation.Autowired;
import org.springframework.beans.factory.annotation.Value;
import org.springframework.stereotype.Component;

/**
 * 消息发送者
 * @author Administrator
 *
 */
@Component
public class Sender {

    @Autowired
    private AmqpTemplate rabbitAmqpTemplate;

    //exchange 交换器名称
    @Value("${mq.config.exchange}")
    private String exchange;

    //routingkey 路由键
    @Value("${mq.config.queue.error.routing.key}")
    private String routingkey;
    /*
     * 发送消息的方法
     */
    public void send(String msg){
        //向消息队列发送消息
        //参数一:交换器名称。
        //参数二:路由键
        //参数三:消息
        this.rabbitAmqpTemplate.convertAndSend(this.exchange, this.routingkey, msg);
    }
}
RabbitmqDirectProviderApplicationTests测试类
package com.lzhpo.rabbitmq.rabbitmqdirectprovider;

import org.junit.Test;
import org.junit.runner.RunWith;
import org.springframework.beans.factory.annotation.Autowired;
import org.springframework.boot.test.context.SpringBootTest;
import org.springframework.test.context.junit4.SpringRunner;

@RunWith(SpringRunner.class)
@SpringBootTest
public class RabbitmqDirectProviderApplicationTests {

    @Autowired
    private Sender sender;

    /**
     * 测试消息队列
     * @throws Exception
     */
    @Test
    public void contextLoads() throws Exception {
        while(true){
            Thread.sleep(1000);
            this.sender.send("Hello RabbitMQ");
        }
    }

}
消费者
pom.xml和生产者的一样。
application.properties
spring.rabbitmq.host=localhost
spring.rabbitmq.port=5672
spring.rabbitmq.username=guest
spring.rabbitmq.password=guest

#设置交换器的名称
mq.config.exchange=log.direct
#info 队列名称
mq.config.queue.info=log.info
#info 路由键
mq.config.queue.info.routing.key=log.info.routing.key
#error 队列名称
mq.config.queue.error=log.error
#error 路由键
mq.config.queue.error.routing.key=log.error.routing.key
ErrorReceiver
package com.lzhpo.rabbitmq.rabbitmqdirectconsumer;

import org.springframework.amqp.core.ExchangeTypes;
import org.springframework.amqp.rabbit.annotation.Exchange;
import org.springframework.amqp.rabbit.annotation.Queue;
import org.springframework.amqp.rabbit.annotation.QueueBinding;
import org.springframework.amqp.rabbit.annotation.RabbitHandler;
import org.springframework.amqp.rabbit.annotation.RabbitListener;
import org.springframework.stereotype.Component;

/**
 * 消息接收者
 * @author Administrator
 * @RabbitListener bindings:绑定队列
 * @QueueBinding  value:绑定队列的名称
 *                exchange:配置交换器
 *
 * @Queue value:配置队列名称
 *        autoDelete:是否是一个可删除的临时队列
 *
 * @Exchange value:为交换器起个名称
 *           type:指定具体的交换器类型
 */
@Component
@RabbitListener(
            bindings=@QueueBinding(
                    value=@Queue(value="${mq.config.queue.error}",autoDelete="true"),
                    exchange=@Exchange(value="${mq.config.exchange}",type=ExchangeTypes.DIRECT),
                    key="${mq.config.queue.error.routing.key}"
            )
        )
public class ErrorReceiver {

    /**
     * 接收消息的方法。采用消息队列监听机制
     * @param msg
     */
    @RabbitHandler
    public void process(String msg){
        System.out.println("Error..........receiver: "+msg);
    }
}
InfoReceiver
package com.lzhpo.rabbitmq.rabbitmqdirectconsumer;

import org.springframework.amqp.core.ExchangeTypes;
import org.springframework.amqp.rabbit.annotation.Exchange;
import org.springframework.amqp.rabbit.annotation.Queue;
import org.springframework.amqp.rabbit.annotation.QueueBinding;
import org.springframework.amqp.rabbit.annotation.RabbitHandler;
import org.springframework.amqp.rabbit.annotation.RabbitListener;
import org.springframework.stereotype.Component;

/**
 * 消息接收者
 * @author Administrator
 * @RabbitListener bindings:绑定队列
 * @QueueBinding  value:绑定队列的名称
 *                exchange:配置交换器
 *
 * @Queue value:配置队列名称
 *        autoDelete:是否是一个可删除的临时队列
 *
 * @Exchange value:为交换器起个名称
 *           type:指定具体的交换器类型
 */
@Component
@RabbitListener(
            bindings=@QueueBinding(
                    value=@Queue(value="${mq.config.queue.info}",autoDelete="true"),
                    exchange=@Exchange(value="${mq.config.exchange}",type=ExchangeTypes.DIRECT),
                    key="${mq.config.queue.info.routing.key}"
            )
        )
public class InfoReceiver {

    /**
     * 接收消息的方法。采用消息队列监听机制
     * @param msg
     */
    @RabbitHandler
    public void process(String msg){
        System.out.println("Info........receiver: "+msg);
    }
}
Main
package com.lzhpo.rabbitmq.rabbitmqdirectconsumer;

import org.springframework.boot.SpringApplication;
import org.springframework.boot.autoconfigure.SpringBootApplication;

@SpringBootApplication
public class RabbitmqDirectConsumerApplication {

    public static void main(String[] args) {
        SpringApplication.run(RabbitmqDirectConsumerApplication.class, args);
    }

}
测试结果
先启动消费者,再运行生产者的测试类RabbitmqDirectProviderApplicationTests测试类。

Topic交换器
主题,规则匹配。

生产者
application.properties
spring.rabbitmq.host=localhost
spring.rabbitmq.port=5672
spring.rabbitmq.username=guest
spring.rabbitmq.password=guest
#设置交换器的名称
mq.config.exchange=log.topic
OrderSender
package com.lzhpo.rabbitmq.rabbitmqtopicprovider;

import org.springframework.amqp.core.AmqpTemplate;
import org.springframework.beans.factory.annotation.Autowired;
import org.springframework.beans.factory.annotation.Value;
import org.springframework.stereotype.Component;

/**
 * 消息发送者
 * @author Administrator
 *
 */
@Component
public class OrderSender {

    @Autowired
    private AmqpTemplate rabbitAmqpTemplate;

    //exchange 交换器名称
    @Value("${mq.config.exchange}")
    private String exchange;

    /*
     * 发送消息的方法
     */
    public void send(String msg){
        //向消息队列发送消息
        //参数一:交换器名称。
        //参数二:路由键
        //参数三:消息
        this.rabbitAmqpTemplate.convertAndSend(this.exchange,"order.log.debug", "order.log.debug....."+msg);
        this.rabbitAmqpTemplate.convertAndSend(this.exchange,"order.log.info", "order.log.info....."+msg);
        this.rabbitAmqpTemplate.convertAndSend(this.exchange,"order.log.warn","order.log.warn....."+msg);
        this.rabbitAmqpTemplate.convertAndSend(this.exchange,"order.log.error", "order.log.error....."+msg);
    }
}
ProductSender
package com.lzhpo.rabbitmq.rabbitmqtopicprovider;

import org.springframework.amqp.core.AmqpTemplate;
import org.springframework.beans.factory.annotation.Autowired;
import org.springframework.beans.factory.annotation.Value;
import org.springframework.stereotype.Component;

/**
 * 消息发送者
 * @author Administrator
 *
 */
@Component
public class ProductSender {

    @Autowired
    private AmqpTemplate rabbitAmqpTemplate;

    //exchange 交换器名称
    @Value("${mq.config.exchange}")
    private String exchange;

    /*
     * 发送消息的方法
     */
    public void send(String msg){
        //向消息队列发送消息
        //参数一:交换器名称。
        //参数二:路由键
        //参数三:消息
        this.rabbitAmqpTemplate.convertAndSend(this.exchange,"product.log.debug", "product.log.debug....."+msg);
        this.rabbitAmqpTemplate.convertAndSend(this.exchange,"product.log.info", "product.log.info....."+msg);
        this.rabbitAmqpTemplate.convertAndSend(this.exchange,"product.log.warn","product.log.warn....."+msg);
        this.rabbitAmqpTemplate.convertAndSend(this.exchange,"product.log.error", "product.log.error....."+msg);
    }
}
UserSender
package com.lzhpo.rabbitmq.rabbitmqtopicprovider;

import org.springframework.amqp.core.AmqpTemplate;
import org.springframework.beans.factory.annotation.Autowired;
import org.springframework.beans.factory.annotation.Value;
import org.springframework.stereotype.Component;

/**
 * 消息发送者
 * @author Administrator
 *
 */
@Component
public class UserSender {

    @Autowired
    private AmqpTemplate rabbitAmqpTemplate;

    //exchange 交换器名称
    @Value("${mq.config.exchange}")
    private String exchange;

    /*
     * 发送消息的方法
     */
    public void send(String msg){
        //向消息队列发送消息
        //参数一:交换器名称。
        //参数二:路由键
        //参数三:消息
        this.rabbitAmqpTemplate.convertAndSend(this.exchange,"user.log.debug", "user.log.debug....."+msg);
        this.rabbitAmqpTemplate.convertAndSend(this.exchange,"user.log.info", "user.log.info....."+msg);
        this.rabbitAmqpTemplate.convertAndSend(this.exchange,"user.log.warn","user.log.warn....."+msg);
        this.rabbitAmqpTemplate.convertAndSend(this.exchange,"user.log.error", "user.log.error....."+msg);
    }
}
RabbitmqTopicProviderApplicationTests测试类
package com.lzhpo.rabbitmq.rabbitmqtopicprovider;

import org.junit.Test;
import org.junit.runner.RunWith;
import org.springframework.beans.factory.annotation.Autowired;
import org.springframework.boot.test.context.SpringBootTest;
import org.springframework.test.context.junit4.SpringRunner;

@RunWith(SpringRunner.class)
@SpringBootTest
public class RabbitmqTopicProviderApplicationTests {

    @Autowired
    private UserSender usersender;

    @Autowired
    private ProductSender productsender;

    @Autowired
    private OrderSender ordersender;

    /**
     * 测试消息队列
     */
    @Test
    public void contextLoads() {
        this.usersender.send("UserSender.....");
        this.productsender.send("ProductSender....");
        this.ordersender.send("OrderSender......");
    }

}
消费者
application.properties
spring.rabbitmq.host=localhost
spring.rabbitmq.port=5672
spring.rabbitmq.username=guest
spring.rabbitmq.password=guest
#设置交换器的名称
mq.config.exchange=log.topic
#info 队列名称
mq.config.queue.info=log.info
#error 队列名称
mq.config.queue.error=log.error
#log 队列名称
mq.config.queue.logs=log.all
ErrorReceiver
package com.lzhpo.rabbitmq.rabbitmqtopicconsumer;

import org.springframework.amqp.core.ExchangeTypes;
import org.springframework.amqp.rabbit.annotation.Exchange;
import org.springframework.amqp.rabbit.annotation.Queue;
import org.springframework.amqp.rabbit.annotation.QueueBinding;
import org.springframework.amqp.rabbit.annotation.RabbitHandler;
import org.springframework.amqp.rabbit.annotation.RabbitListener;
import org.springframework.stereotype.Component;

/**
 * 消息接收者
 * @author Administrator
 * @RabbitListener bindings:绑定队列
 * @QueueBinding  value:绑定队列的名称
 *                exchange:配置交换器
 *
 * @Queue value:配置队列名称
 *        autoDelete:是否是一个可删除的临时队列
 *
 * @Exchange value:为交换器起个名称
 *           type:指定具体的交换器类型
 */
@Component
@RabbitListener(
            bindings=@QueueBinding(
                    value=@Queue(value="${mq.config.queue.error}",autoDelete="true"),
                    exchange=@Exchange(value="${mq.config.exchange}",type=ExchangeTypes.TOPIC),
                    key="*.log.error"
            )
        )
public class ErrorReceiver {

    /**
     * 接收消息的方法。采用消息队列监听机制
     * @param msg
     */
    @RabbitHandler
    public void process(String msg){
        System.out.println("......Error........receiver: "+msg);
    }
}
InfoReceiver
package com.lzhpo.rabbitmq.rabbitmqtopicconsumer;

import org.springframework.amqp.core.ExchangeTypes;
import org.springframework.amqp.rabbit.annotation.Exchange;
import org.springframework.amqp.rabbit.annotation.Queue;
import org.springframework.amqp.rabbit.annotation.QueueBinding;
import org.springframework.amqp.rabbit.annotation.RabbitHandler;
import org.springframework.amqp.rabbit.annotation.RabbitListener;
import org.springframework.stereotype.Component;

/**
 * 消息接收者
 * @author Administrator
 * @RabbitListener bindings:绑定队列
 * @QueueBinding  value:绑定队列的名称
 *                exchange:配置交换器
 *
 * @Queue value:配置队列名称
 *        autoDelete:是否是一个可删除的临时队列
 *
 * @Exchange value:为交换器起个名称
 *           type:指定具体的交换器类型
 */
@Component
@RabbitListener(
            bindings=@QueueBinding(
                    value=@Queue(value="${mq.config.queue.info}",autoDelete="true"),
                    exchange=@Exchange(value="${mq.config.exchange}",type=ExchangeTypes.TOPIC),
                    key="*.log.info"
            )
        )
public class InfoReceiver {

    /**
     * 接收消息的方法。采用消息队列监听机制
     * @param msg
     */
    @RabbitHandler
    public void process(String msg){
        System.out.println("......Info........receiver: "+msg);
    }
}
LogsReceiver
package com.lzhpo.rabbitmq.rabbitmqtopicconsumer;

import org.springframework.amqp.core.ExchangeTypes;
import org.springframework.amqp.rabbit.annotation.Exchange;
import org.springframework.amqp.rabbit.annotation.Queue;
import org.springframework.amqp.rabbit.annotation.QueueBinding;
import org.springframework.amqp.rabbit.annotation.RabbitHandler;
import org.springframework.amqp.rabbit.annotation.RabbitListener;
import org.springframework.stereotype.Component;

/**
 * 消息接收者
 * @author Administrator
 * @RabbitListener bindings:绑定队列
 * @QueueBinding  value:绑定队列的名称
 *                exchange:配置交换器
 *
 * @Queue value:配置队列名称
 *        autoDelete:是否是一个可删除的临时队列
 *
 * @Exchange value:为交换器起个名称
 *           type:指定具体的交换器类型
 */
@Component
@RabbitListener(
            bindings=@QueueBinding(
                    value=@Queue(value="${mq.config.queue.logs}",autoDelete="true"),
                    exchange=@Exchange(value="${mq.config.exchange}",type=ExchangeTypes.TOPIC),
                    key="*.log.*"
            )
        )
public class LogsReceiver {

    /**
     * 接收消息的方法。采用消息队列监听机制
     * @param msg
     */
    @RabbitHandler
    public void process(String msg){
        System.out.println("......All........receiver: "+msg);
    }
}
Main
package com.lzhpo.rabbitmq.rabbitmqtopicconsumer;

import org.springframework.boot.SpringApplication;
import org.springframework.boot.autoconfigure.SpringBootApplication;

@SpringBootApplication
public class RabbitmqTopicConsumerApplication {

    public static void main(String[] args) {
        SpringApplication.run(RabbitmqTopicConsumerApplication.class, args);
    }

}
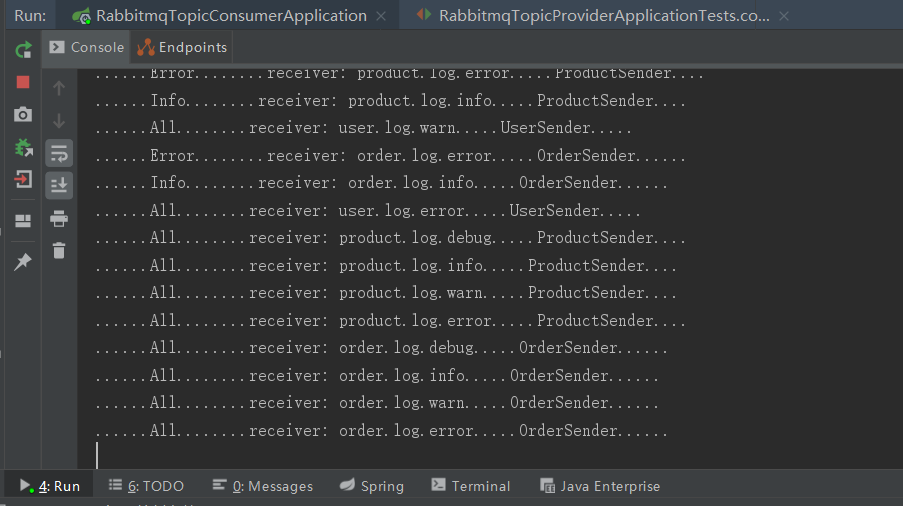
测试结果
先启动消费者,然后再运行RabbitmqTopicProviderApplicationTests测试类。

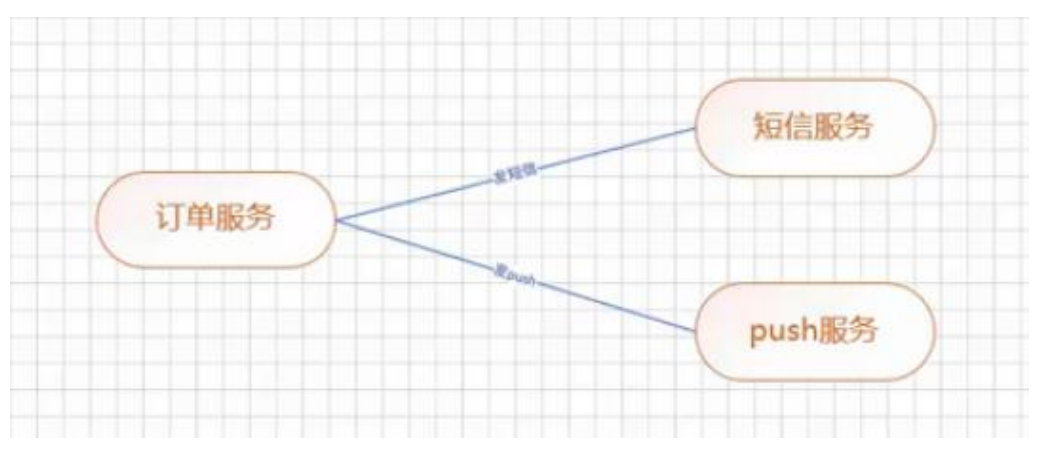
Fanout交换器
广播。


生产者
application.properties
spring.rabbitmq.host=localhost
spring.rabbitmq.port=5672
spring.rabbitmq.username=guest
spring.rabbitmq.password=guest
#设置交换器的名称
mq.config.exchange=order.fanout
Sender
package com.lzhpo.rabbitmq.rabbitmqfanoutprovider;

import org.springframework.amqp.core.AmqpTemplate;
import org.springframework.beans.factory.annotation.Autowired;
import org.springframework.beans.factory.annotation.Value;
import org.springframework.stereotype.Component;

/**
 * 消息发送者
 * @author Administrator
 *
 */
@Component
public class Sender {
    @Autowired
    private AmqpTemplate rabbitAmqpTemplate;
    //exchange 交换器名称
    @Value("${mq.config.exchange}")
    private String exchange;
    /*
     * 发送消息的方法
     */
    public void send(String msg){
        //向消息队列发送消息
        //参数一:交换器名称。
        //参数二:路由键
        //参数三:消息
        this.rabbitAmqpTemplate.convertAndSend(this.exchange,"",
                msg);
    }
}
RabbitmqFanoutProviderApplicationTests测试类
package com.lzhpo.rabbitmq.rabbitmqfanoutprovider;

import org.junit.Test;
import org.junit.runner.RunWith;
import org.springframework.beans.factory.annotation.Autowired;
import org.springframework.boot.test.context.SpringBootTest;
import org.springframework.test.context.junit4.SpringRunner;

@RunWith(SpringRunner.class)
@SpringBootTest
public class RabbitmqFanoutProviderApplicationTests {

    @Autowired
    private Sender sender;

    /**
     * 测试消息队列
     * @throws Exception
     */
    @Test
    public void contextLoads() throws Exception {
        while(true){
            Thread.sleep(1000);
            this.sender.send("Hello RabbitMQ");
        }
    }

}
消费者
application.properties
spring.rabbitmq.host=localhost
spring.rabbitmq.port=5672
spring.rabbitmq.username=guest
spring.rabbitmq.password=guest
#设置交换器的名称
mq.config.exchange=order.fanout
#短信服务队列名称
mq.config.queue.sms=order.sms
#push 服务队列名称
mq.config.queue.push=order.push
SmsReceiver
package com.lzhpo.rabbitmq.rabbitmqfanoutconsumer;

import org.springframework.amqp.core.ExchangeTypes;
import org.springframework.amqp.rabbit.annotation.Exchange;
import org.springframework.amqp.rabbit.annotation.Queue;
import org.springframework.amqp.rabbit.annotation.QueueBinding;
import org.springframework.amqp.rabbit.annotation.RabbitHandler;
import org.springframework.amqp.rabbit.annotation.RabbitListener;
import org.springframework.stereotype.Component;

/**
 * 消息接收者
 * @author Administrator
 * @RabbitListener bindings:绑定队列
 * @QueueBinding  value:绑定队列的名称
 *                exchange:配置交换器
 *                key:路由键
 *
 * @Queue value:配置队列名称
 *        autoDelete:是否是一个可删除的临时队列
 *
 * @Exchange value:为交换器起个名称
 *           type:指定具体的交换器类型
 */
@Component
@RabbitListener(
            bindings=@QueueBinding(
                    value=@Queue(value="${mq.config.queue.sms}",autoDelete="true"),
                    exchange=@Exchange(value="${mq.config.exchange}",type=ExchangeTypes.FANOUT)
            )
        )
public class SmsReceiver {

    /**
     * 接收消息的方法。采用消息队列监听机制
     * @param msg
     */
    @RabbitHandler
    public void process(String msg){
        System.out.println("Sms........receiver: "+msg);
    }
}
PushReceiver
package com.lzhpo.rabbitmq.rabbitmqfanoutconsumer;

import org.springframework.amqp.core.ExchangeTypes;
import org.springframework.amqp.rabbit.annotation.Exchange;
import org.springframework.amqp.rabbit.annotation.Queue;
import org.springframework.amqp.rabbit.annotation.QueueBinding;
import org.springframework.amqp.rabbit.annotation.RabbitHandler;
import org.springframework.amqp.rabbit.annotation.RabbitListener;
import org.springframework.stereotype.Component;

/**
 * 消息接收者
 * @author Administrator
 * @RabbitListener bindings:绑定队列
 * @QueueBinding  value:绑定队列的名称
 *                exchange:配置交换器
 *
 * @Queue value:配置队列名称
 *        autoDelete:是否是一个可删除的临时队列
 *
 * @Exchange value:为交换器起个名称
 *           type:指定具体的交换器类型
 */
@Component
@RabbitListener(
            bindings=@QueueBinding(
                    value=@Queue(value="${mq.config.queue.push}",autoDelete="true"),
                    exchange=@Exchange(value="${mq.config.exchange}",type=ExchangeTypes.FANOUT)
            )
        )
public class PushReceiver {

    /**
     * 接收消息的方法。采用消息队列监听机制
     * @param msg
     */
    @RabbitHandler
    public void process(String msg){
        System.out.println("Error..........receiver: "+msg);
    }
}
Main
package com.lzhpo.rabbitmq.rabbitmqfanoutconsumer;

import org.springframework.boot.SpringApplication;
import org.springframework.boot.autoconfigure.SpringBootApplication;

@SpringBootApplication
public class RabbitmqFanoutConsumerApplication {

    public static void main(String[] args) {
        SpringApplication.run(RabbitmqFanoutConsumerApplication.class, args);
    }

}
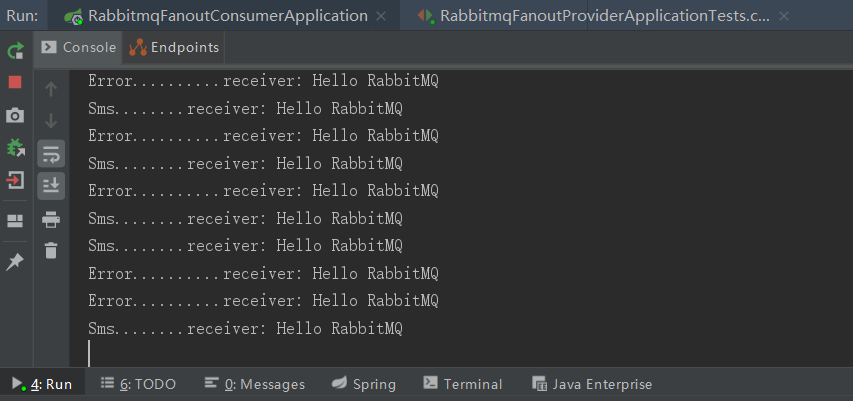
测试结果
先启动消费者,然后再启动生产者RabbitmqFanoutProviderApplicationTests测试类。

- 本文标签: RabbitMQ
- 本文链接: http://www.lzhpo.com/article/6
- 版权声明: 本文由lzhpo原创发布,转载请遵循《署名-非商业性使用-相同方式共享 4.0 国际 (CC BY-NC-SA 4.0)》许可协议授权


